Vaultini
I’ve worked daily with HashiCorp Vault, Terraform, and Docker and combined them in many useful ways.
The first time I did this was back in 2017 with Vaultron.
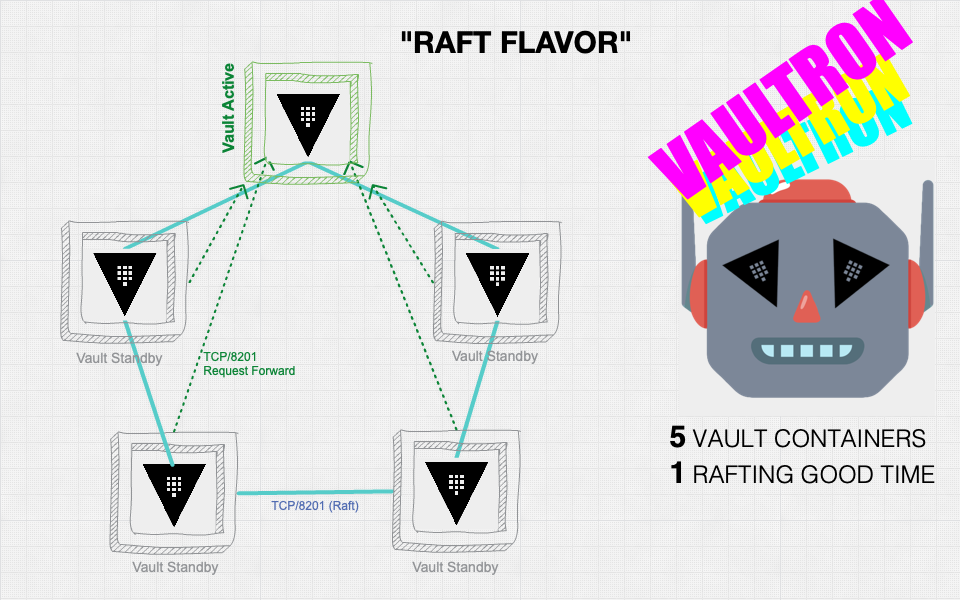
Alas, Vaultron quickly grew mighty, but also complicated and a bit bloated by feature creep. Since its formation also predated integrated storage in Vault, I felt that the support for integrated storage which I bolted on just further increased its bloat.
I decided to start anew with Vaultini.

The name Vaultini hints at the tininess of the project when compared to Vaultron.
Vaultini spins up a useful Vault cluster in Docker for development, educating, or testing with little effort or time.
Vaultini accomplishes this goal with Terraform, the Terraform Docker Provider, and a
- Latest available official Vault community edition Docker image version
- Integrated storage (sorry, no Consul support)
- 5 nodes with deterministic host names and IP addresses and TLS enabled
- Shamir’s seal with a single key share for convenience
- Load balancer with TLS connects to active Vault node
To make a Vault cluster with Vaultini, you need the following prerequisites:
- Linux or macOS
- Vault binary installed for the smoothest experience
- Terraform CLI
- git
- BSD
make or gnumake - Docker
Provided your computer meets all the preceding requirements, you can make a Vault cluster in 4 steps.
-
Clone the project repository.
git clone https://github.com/brianshumate/vaultini.git -
Change into the vaultini directory.
cd vaultini -
Export the VAULT_CACERT environment variable to point to the Vaultini Certificate Authority file:
export VAULT_CACERT="$PWD/containers/vaultini1/certs/vaultini-ca.pem" -
Make a Vault cluster.
make
After about 30 seconds, Vaultini presents some helpful output to get you started with your shiny new Vault cluster.
[vaultini] Initializing Terraform workspace ...Done.
[vaultini] Applying Terraform configuration ...Done.
[vaultini] Checking Vault active node status ...Done.
[vaultini] Checking Vault initialization status ...Done.
[vaultini] Unsealing cluster nodes .....vaultini2. vaultini3. vaultini4. vaultini5. Done.
[vaultini] Enable audit device ...Done.
[vaultini] Export VAULT_ADDR for the load balancer : export VAULT_ADDR=https://localhost:8443
[vaultini] Unseal key for nodes: c0ff33JUsi9H9M3b7wVqc0FF33tCrxFaerpdi8v9zhw=
[vaultini] Login with root token: vault login hvs.8c0ff33YwhvWi0DiOw88bPNI
To inform the Vault client how to connect to the cluster, export the
export VAULT_ADDR=https://127.0.0.1:8443Check Vault status.
vault status
Key                     Value
---                     -----
Seal Type               shamir
Initialized             true
Sealed                  false
Total Shares            1
Threshold               1
Version                 1.21.0
Build Date              2025-10-21T19:33:18Z
Storage Type            raft
Cluster Name            vault-cluster-1b31e391
Cluster ID              c35af9bf-fcac-1c56-6d76-50af5a4ec394
Removed From Cluster    false
HA Enabled              true
HA Cluster              https://10.1.42.101:8201
HA Mode                 active
Active Since            2025-11-11T21:31:39.1180473Z
Raft Committed Index    52
Raft Applied Index      52
You now have a Vault cluster ready for use through the load balancer address. Use the operator raft command to list the cluster peers:
vault operator raft list-peers
Node         Address             State       Voter
----         -------             -----       -----
vaultini1    10.1.42.101:8201    leader      true
vaultini2    10.1.42.102:8201    follower    true
vaultini3    10.1.42.103:8201    follower    true
vaultini4    10.1.42.104:8201    follower    true
vaultini5 10.1.42.105:8201 follower trueTip: You can also access Vault with a browser and the web UI: https://localhost:8200.
Cleanup
When you finish using Vaultini, you have 2 options for cleaning up its artifacts.
To clean up Docker containers and all generated artifacts, including audit device log files:
make cleanTo clean up everything including Terraform runtime configuration and state:
make cleanestNote: Vaultini doesn’t remove its own log,
Check out the project README.md for more details.
Next steps
New to Vault and unsure what to do next?
-
Dive into some of the available tutorials on the HashiCorp Developer site.
You can use Vaultini as your dev mode Vault server right now for many of the tutorial scenarios.
Enjoy!